The pumps don't appreciate being run dry, and they're almost certainly going to run. They're probably OK to run dead-headed, but I'd reconnect what can be reconnected, AND fill they right side reservoir with something. Distilled water if you can't collect/reuse. G48 50/50 mix if you can (for the right reservoir; pink Toyota SLLC for the cabin heater reservoir).

You are using an out of date browser. It may not display this or other websites correctly.
You should upgrade or use an alternative browser.
You should upgrade or use an alternative browser.
Charging: Stopped by System Malfunction
- Thread starter Improve_RAV4EV
- Start date


Help Support Toyota Rav4 EV Forum:
This site may earn a commission from merchant affiliate
links, including eBay, Amazon, and others.
If it were me, I'd pull the three 15A pump fuses: P/T W/P, BATT W/P 1, and BATT W/P 2. I believe these are on the driver's side fuse box. The cabin heater pump should not run if the HVAC is off. Yes, there will be errors reported in TPD for the pumps, but we can ignore those for the time being.
Improve_RAV4EV
Member
It's up to you. The pumps will want to turn on, so you would either need to block the ports of all open lines, or re-connect them to the OBC and DC-DC. I'd vote for the latter.
I blocked both the hoses and the tubes by male & female rubber plugs and clamped, as in the attached pics. Would they stand the pressure of the pumps?
Attachments


toyotaev
Member
Can you explain what mother board to swap it over to? I took your advice and ordered a charger from Ebay. Im having the same problem.I had this same issue a few months ago: my RAV failed to charge with all other systems being ok. 90% of the time, it is one of the internal fuses that has blown. However, just like you, the fuses in my charger ended up testing fine.
Rather than try to track down the defective component in my charger, I just grabbed one of the spare gen 1 Tesla chargers I had on hand, swapped the control board out of the RAV OBC over to the Tesla OBC, re-installed and all is good.
My recommendation for you: grab a gen 1 Tesla charger from eBay or your favorite auto parts recycler, and either re-flash the unit to be RAV-compatible via the TPD software, or (simpler) move over the control board from your current RAB OBC. Alternatively, I have a few tested gen 1 OBCs that I can sell/ship you one that's been re-flashed; PM for more info.
toyotaev
Member
I have the same problem can you send a link to this thread about checking current/contextual data from the Tesla system in charging mode? How do I do this?A completely trivial situation.
Before starting repairs, you need to make diagnostics!
Determining the cause of a charging failure is easy after collecting and analyzing current/contextual data from the Tesla system in charging mode.
There are dozens of threads on this forum that confirm this method...
Improve_RAV4EV
Member
I blocked both the hoses and the tubes by male & female rubber plugs and clamped, as in the attached pics. Would they stand the pressure of the pumps?
I'll first try hokiematt's suggestion to remove the fuses. Sounds logical. Thanks.
Another option would be to connect the hoses by a pipe and bypass the component, 'cause, it is hard to connect-detach the OBC hose on the passenger side, it is upside down.


$16.06
$16.91
MICTUNING Upgraded Dual USB Port 6.4A QC3.0 Quick Charger with Blue LED Digital Voltmeter Replacement for Toyota, Compatible with Cellphone iPad PDA Laptop GPS (Surface Size 1.6 x 0.9 inches)
Nado Stuff (Authorized Dealer)


Improve_RAV4EV
Member
The pumps don't appreciate being run dry, and they're almost certainly going to run. They're probably OK to run dead-headed, but I'd reconnect what can be reconnected, AND fill they right side reservoir with something. Distilled water if you can't collect/reuse. G48 50/50 mix if you can (for the right reservoir; pink Toyota SLLC for the cabin heater reservoir).
I pinched the hoses and put the plugs, thus the coolant is confined in the system. Therefore, the pumps are not dry.
When run, they'd cause a little, negligible cavitation, I thing. For few minutes, it should be OK..?
As a result, the reservoirs on the driver side are full. And, I have the fluids anyway.
BTW, how often the fluids need to be changed? Is there a criteria, other than the manual's recommendation?
My OBC AC Input fuses replacement thread shows both the IC message, and the associated TPD screenshots.I have the same problem can you send a link to this thread about checking current/contextual data from the Tesla system in charging mode? How do I do this?
Not a "motherboard", but it's a PCB, yes. After removing the sheet metal top cover and then the surround chassis -- which you have to do to replace the AC Input fuses -- the control PCB can be disconnected and unscrewed. Matt included in a picture of it in post #6 in this thread.Can you explain what mother board to swap it over to?
I wrote a Wiki on the GEN1 Tesla OBC (also used in early Superchargers, in parallel config), but it doesn't have any info on the internals.
Regardless of whether you check your OBC or purchase a replacement, replace the AC Input fuses, as they are now considered wear items/consumables.
Last edited:
I pinched the hoses and put the plugs, thus the coolant is confined in the system. Therefore, the pumps are not dry.
When run, they'd cause a little, negligible cavitation, I thing. For few minutes, it should be OK..?
The pump bearing is designed to be flooded, so as long as it's got some coolant in there, I think it'll be OK.
BTW, how often the fluids need to be changed? Is there a criteria, other than the manual's recommendation?
50k miles for the LDU (drive unit: motor) side. I think Toyota changes the coolant on both sides at the 50k service. Heck, maybe they change out the Cabin Heater coolant as well, IDK.
Since I had both a heater failure (72k mi., 2019) and an LDU replacement (59k mi., 2018) within the approximate timeframe, I never paid to have the coolant replaced: it was all still under either the original powertrain warranty or, later, under the Toyota extended warranty.
By the time my LDU leaked again, I'd declined to renew the extended warranty, so the LDU side got new coolant again last April -- this time by me.
Ok,I'll first try hokiematt's suggestion to remove the fuses. Sounds logical. Thanks.
Another option would be to connect the hoses by a pipe and bypass the component, 'cause, it is hard to connect-detach the OBC hose on the passenger side, it is upside down.
It's your choice.
Note: There are almost 50 fault codes for the RAV4EV charging system, but only one of them is directly related to the fuses.
IMHO. Treating a patient based on the symptoms of a hospital neighbor, and not on the test data, is a risky scenario and a lottery.
Good luck with the repair!
Best Regards, Vlad.
For example, take a lookI have the same problem can you send a link to this thread about checking current/contextual data from the Tesla system in charging mode? How do I do this?
,
,
BR,
Improve_RAV4EV
Member
What size HDD is needed to run both Tesla V1.1.46 and Toyota TechStream diagnostic SWs on a laptop?
Would a large USB disk do the job (in addition to the internal HDD)?
Would a large USB disk do the job (in addition to the internal HDD)?
Huh. I've never looked at installation requirements of either TS or TPD. Give it a try on a USB disk and let us know.
toyotaev
Member
For example, take a look
,
,
BR,
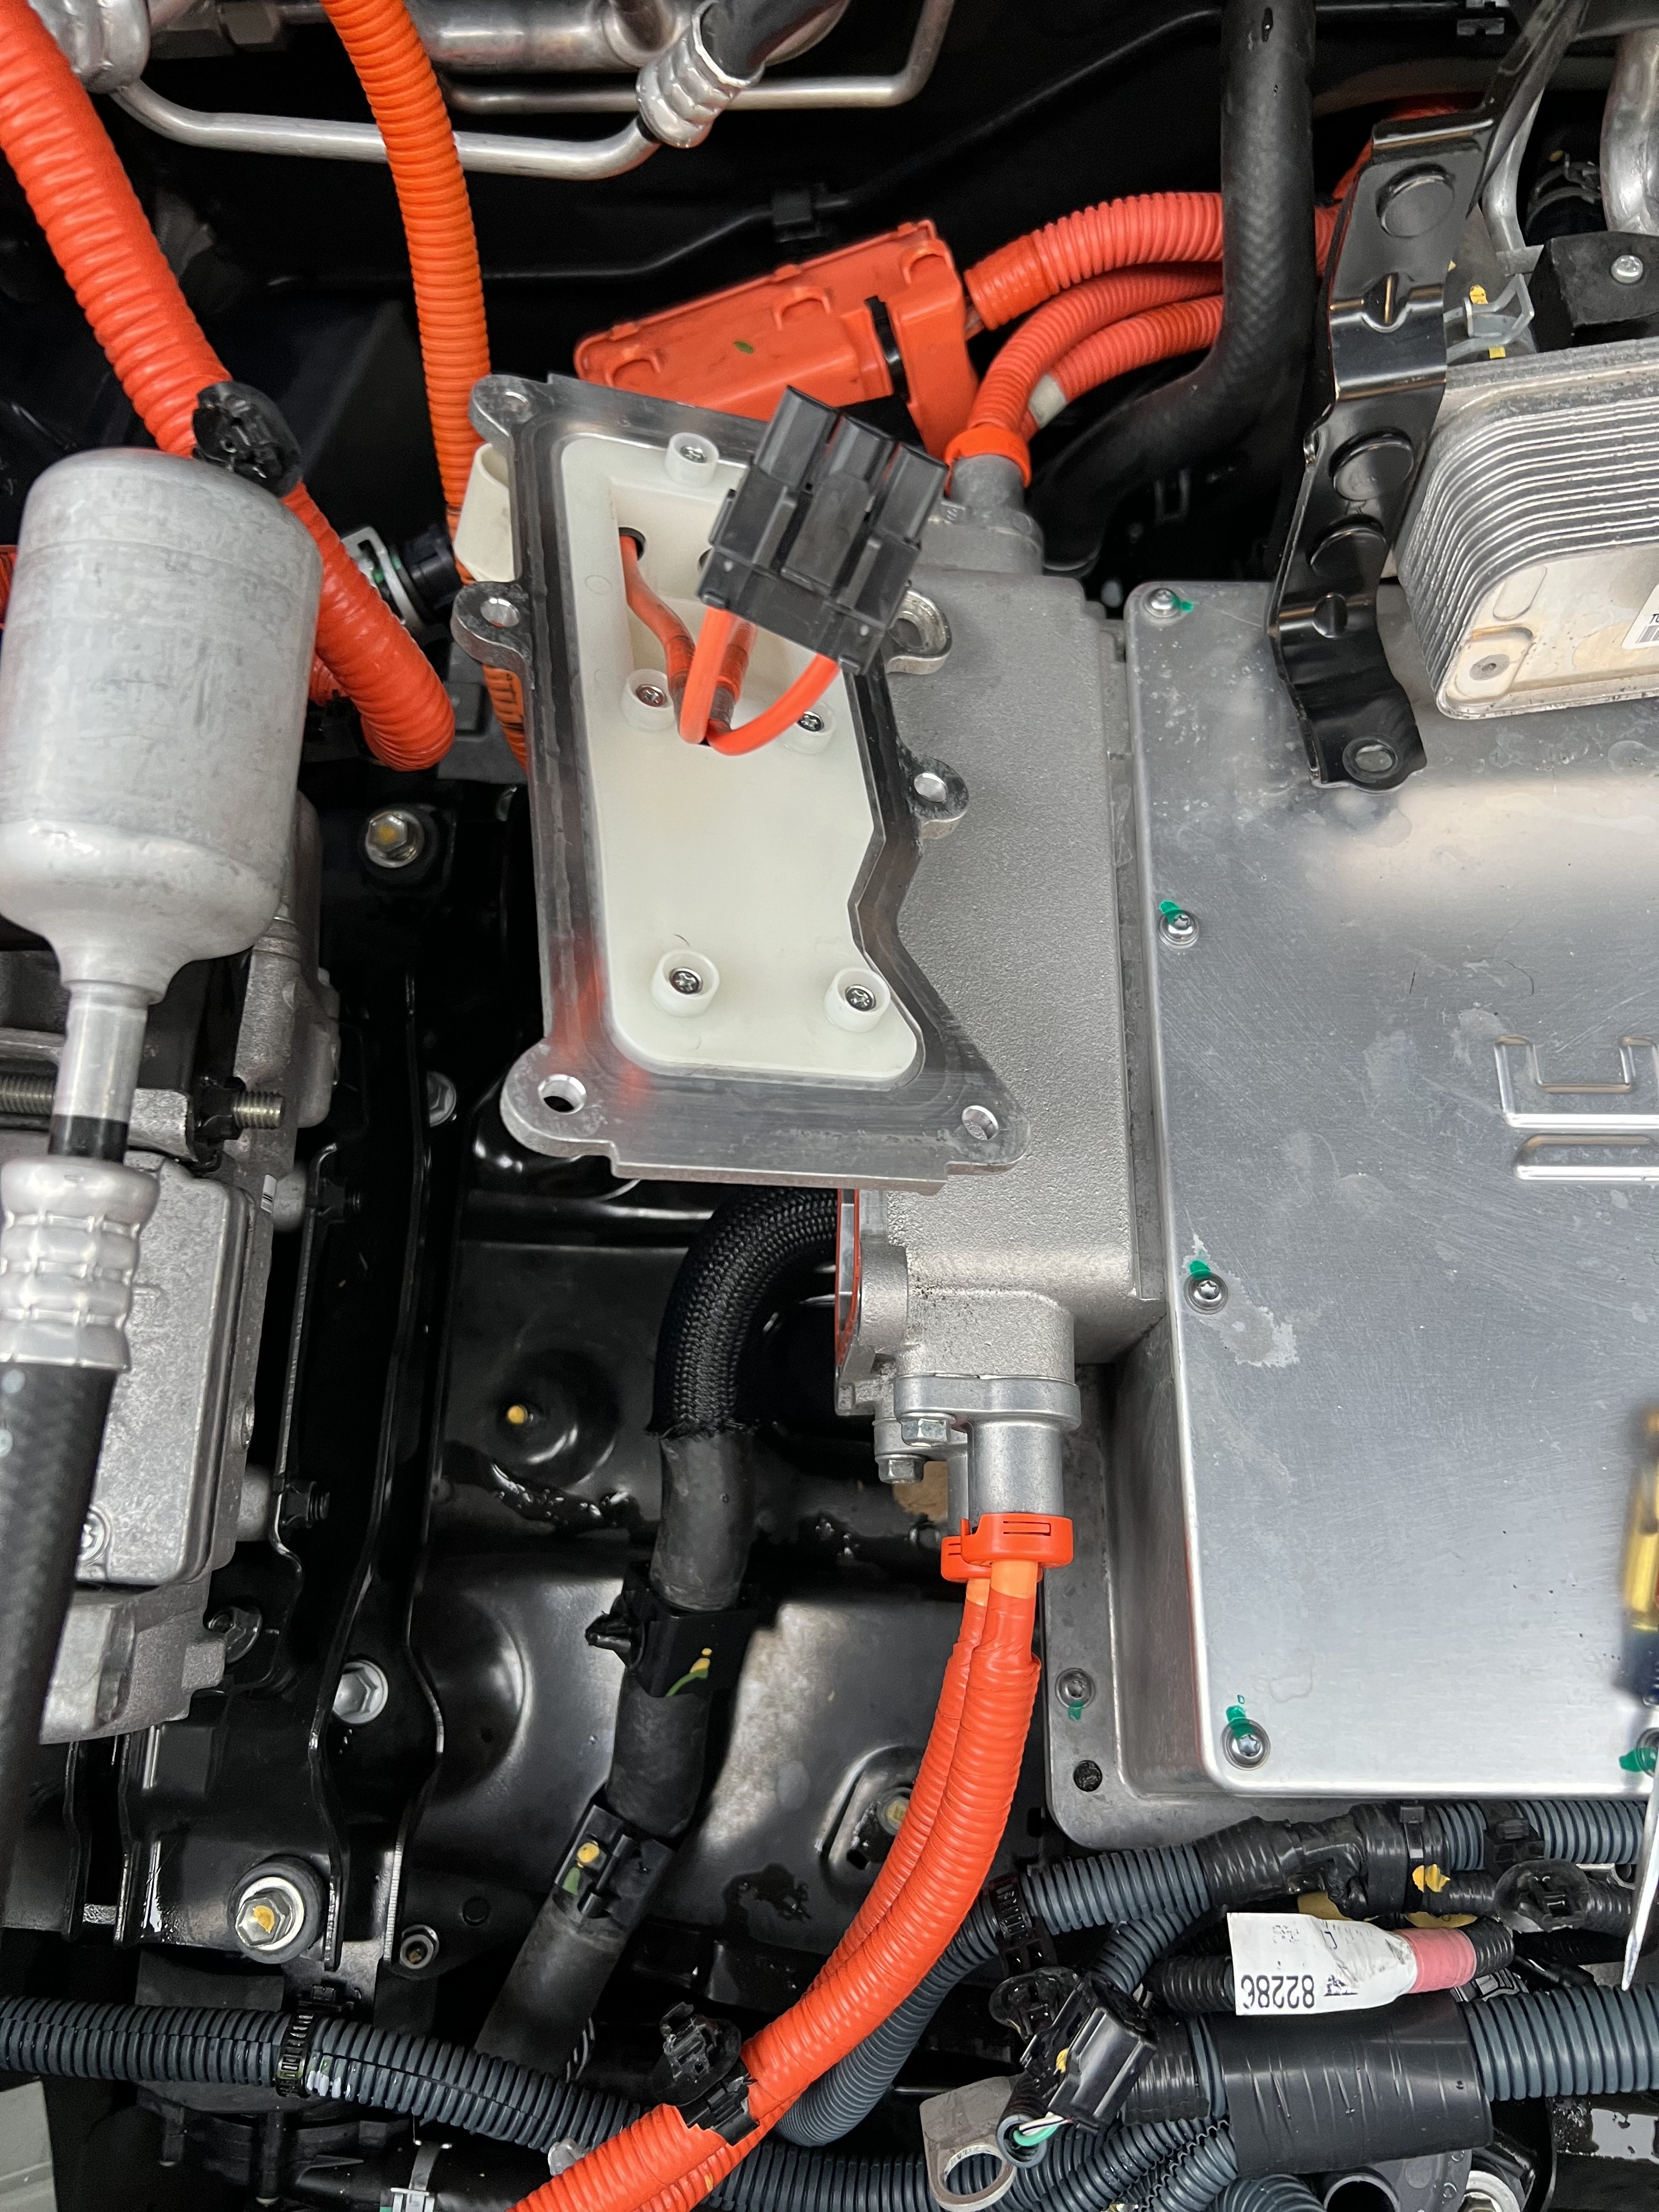
I mostly have the on board charger removed but I cannot figure out how to disconnect the big orange wires from the right side of the on board charger. What should I do? Do you know how to disconnect the wires from that little box on the side? I cannot see inside the box. Not much room to see or move.
This?I mostly have the on board charger removed but I cannot figure out how to disconnect the big orange wires from the right side of the on board charger. What should I do? Do you know how to disconnect the wires from that little box on the side? I cannot see inside the box. Not much room to see or move.
https://www.myrav4ev.com/threads/how-i-fixed-my-rav4-ev-on-board-charger.2537/page-2#post-30068
Take a look Jim's charger repair report
https://alflash.com.ua/2019/to_rav4ev/Story2022-08-13.pdf
Last edited:
toyotaev
Member
Yes
They don't come off the HVJB cover; you remove the cover with them attached.
Read this post and scroll down to where I showed how I took mine apart.
I wrote:
Read this post and scroll down to where I showed how I took mine apart.
I wrote:
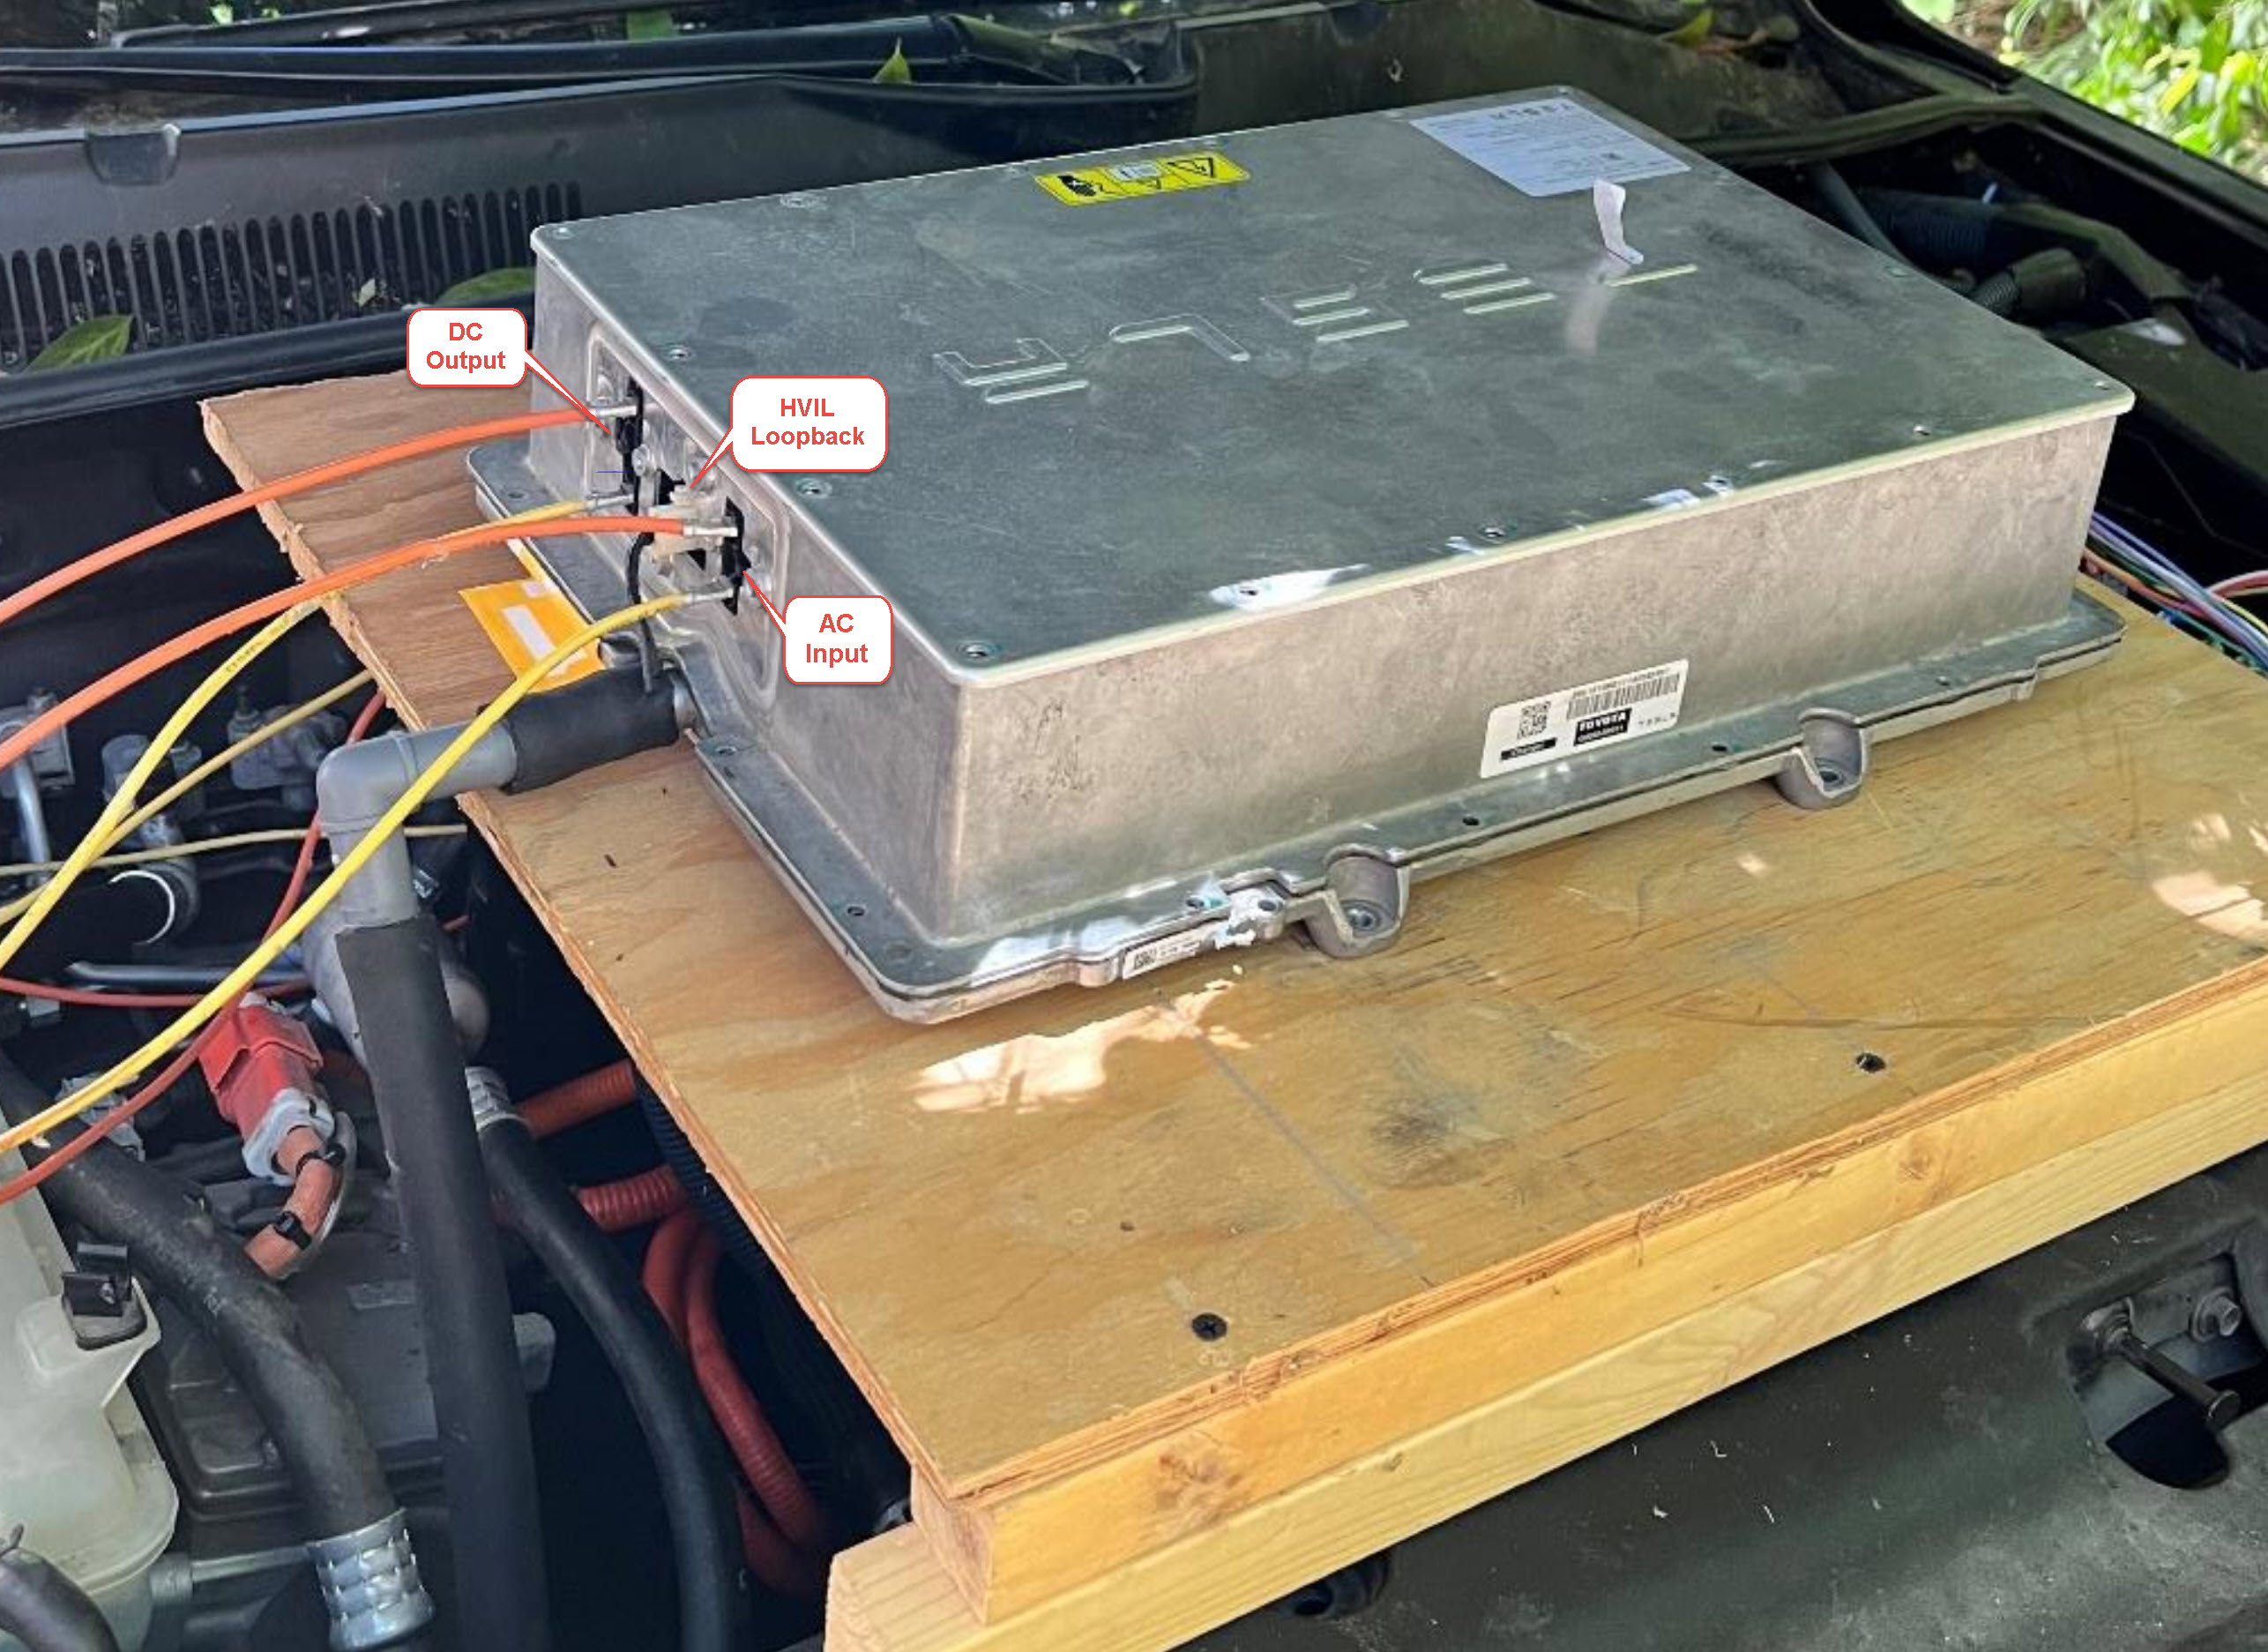
After removing the driver's side coolant line to the bottom of the OBC, and the four bolts holding the OBC down, it can be shifted a couple of inches to the driver's side, which provides enough room to remove the HVJB cover and begin working on the many, many bolted connections plus the two AC & DC connectors.
Releasing the tab on this AC input connector is especially not fun, as you are working with a mirror to place a tool on the tab to depress it. And you can't depress the tab and pull the harness at the same time, no room for two hands. Hemostat-like pliers helped a little.
Similar threads
- Replies
- 253
- Views
- 11K
- Replies
- 18
- Views
- 2K