OK to drive with BMS_f038 code?

Toyota Rav4 EV Forum

Help Support Toyota Rav4 EV Forum:

This site may earn a commission from merchant affiliate links, including eBay, Amazon, and others.
I recall that I used a small flat-blade screwdriver to push up on the outer end of the locking mechanism, which should then pivot the inner locking claw down. I may have even twisted the screwdriver against the fixed piece that covers the tab mechanism.

IMG_9044.jpg

Tricky to get a flat blade below the black yet above the blue loop, to pry up on the back of the hook. Esp. since there's only about 2" vertical clearance from the top of the lid to the bottom of that connector.

IMG_8935.jpg

All in all I didn't know what I was facing, so dropping the pack 6" made all the difference.
 
Al,
Thanks for the claw pics. Always easier to see how it works after you get it apart once!
And the great write-up. It will undoubtedly be very useful one day.
Jeff
 
Yesterday, I replaced the contactors and installed a separate BMS mounting plate ground strap. These notes are for the next time I have to do this job.

I've found that much of electronics diagnostics is just looking at things. Tapioca on left, Butterscotch on right:

IMG_9082.jpg

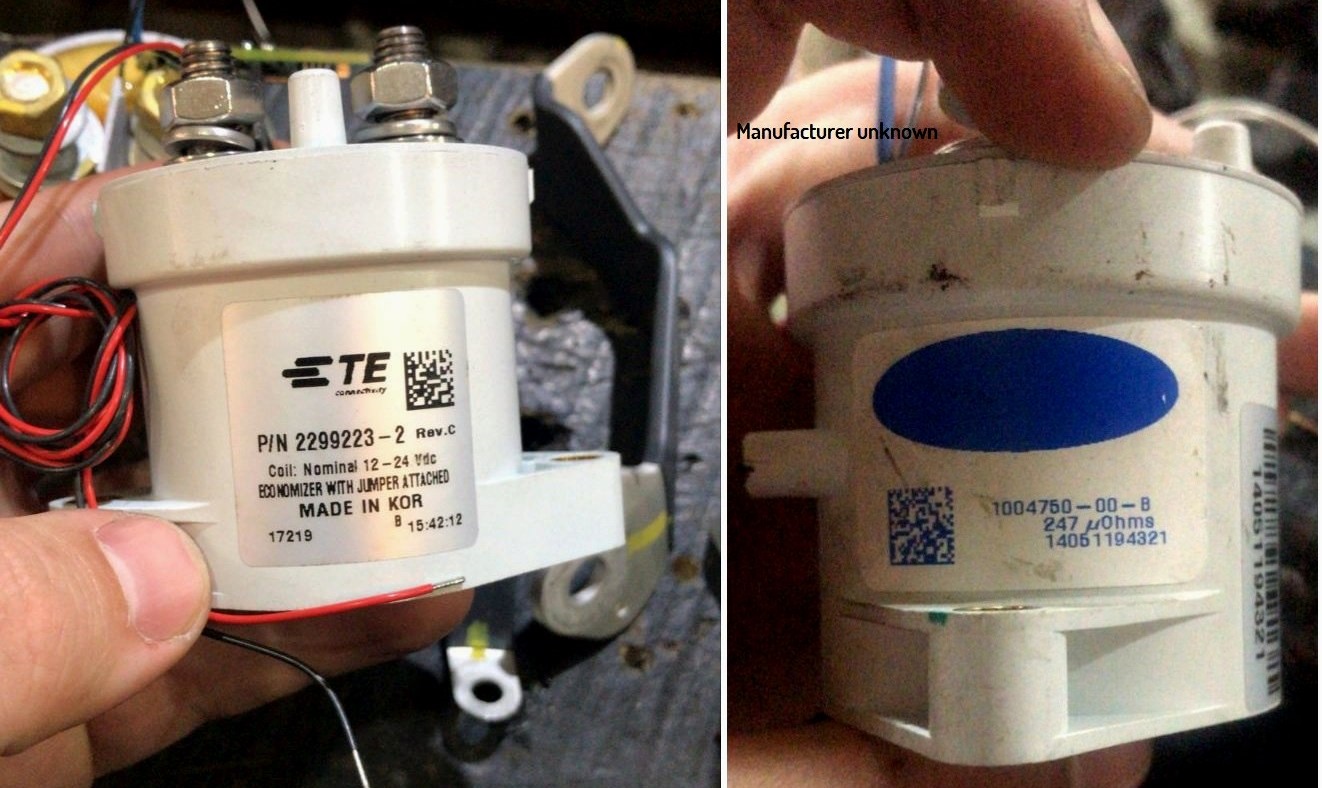
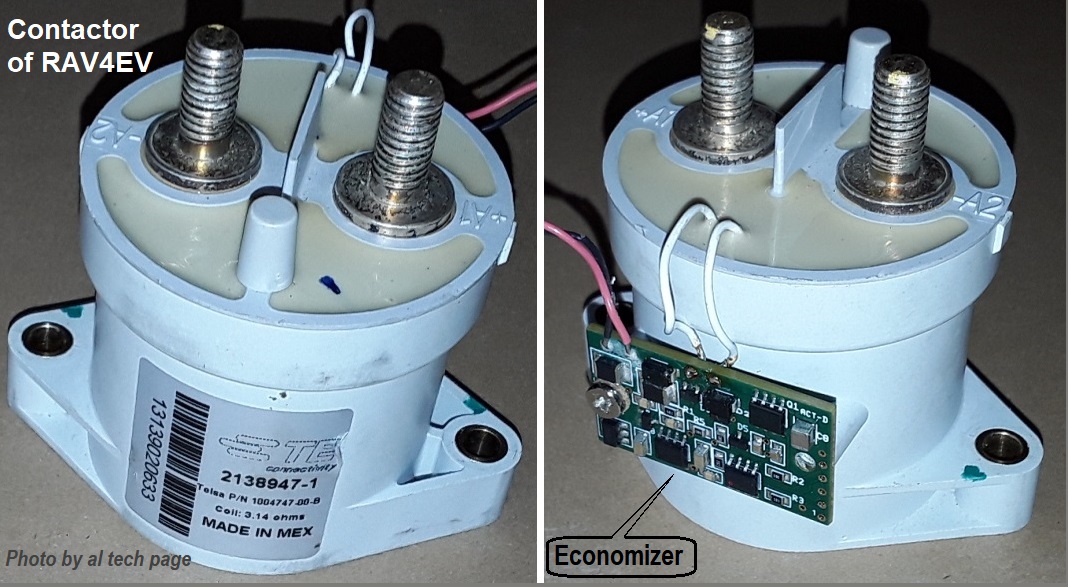
Interesting that the two contactors have different part Nos., though the contacts polarity is the same. Current-carrying contacts in the DC world are polarized, and datasheets routinely warn of reduced contact life if the contacts are opened under load, and especially if the polarity is reversed and opened under load, which can sometimes occur.

Passenger side: TE 2138947-1 (Tesla 1004747-00-B)
Driver's side:::::: TE 2138948-1 (Tesla 1004750-00-B)

IMG_9073-1.jpg

Top view comparison with the GV200:
IMG_9076.jpg

Before removing anything:
IMG_9038-1.jpg

The copper laminate strap (insulated in orange, above) is flexible, but the other straps are aluminum and are not. This means that you have to (should) disconnect both ends of every aluminum strap to remove them, to R&R the contactors.

You kind of have to replace the Driver's side contactor first, because the Passenger side's output strap prevents removing or lifting the Driver's side's output strap far enough to remove the Driver's side contactor. Therefore, you can't finish the Passenger side until finishing the Driver's side. This is the order that I (eventually) used:

IMG_9038-2.jpg

Mark the coils' wires' polarity first. I cut each wire one at a time, then slipped color heat-shrink up the harness and affixed it. If you do this one-at-a-time, it'll stay sorted. You could use tape or labels, too.

1 = 8mm
2 = 13mm
3 = T10
Lift out strap and remove completely.
4 = 8mm
5 = 13mm
Lift small strap
6 = T10
7 = Lift strap just far enough to clear contactor stud
8 = 13mm
9 = Remove orange shunt cover, then 13mm
Lift out strap

The Driver's side contactor can then be unbolted (8mm x2) and lifted out.

IMG_9078-1.jpg

The Passenger side contactor is comparatively easier, as you've already removed the two hard straps, and the copper laminate strap is quite flexible and can be lifted an inch. You've already read above about the problem I encountered when attempting to remove that long ground strap from the corner of the battery, to ease removing the Passenger side contactor hold-down nut, so next time . . . I will probably attempt to remove that nut from the side, and leave that ground strap alone.

Better view of three of the four T10 screws. These thread into plastic, so be careful when tightening:

IMG_9085-1.jpg

Contactors installed, aux. ground strap installed:
IMG_9087.jpg
 
Last edited:
I'm waiting for a couple of HV battery dehumidifier air pumps to arrive; meanwhile, I've set the battery lid in place this morning.

I had first tried out some 1/8" x 3/4" butyl tape sourced via Amazon, but found it difficult (for me) to apply. If insufficient tension is applied during laydown, it won't lay where you want it, but if too much tension is applied, it thins out in both cross-section and width, yielding really inconsistent results. I layed down one side and stopped, then took 20 minutes to remove it. It did come off easier than the OEM stuff, though.

Instead, I bought two rolls of 1/4" "round" x 40' butyl tape via Home Depot -- I used only one roll and returned the other -- and ran two beads down, one inside the bolt line, one outside. This stuff is actually kind of square as delivered, and applies very easily, does not require a lot of tension to guide when laying down, and can be moved if a problem is found fairly quickly. It's also half the cost of the other stuff I'd tried.

IMG_9190.jpg IMG_9192.jpg IMG_9193.jpg IMG_9194.jpg IMG_9195.jpg

The rolls have a lot of "lint" from when they cut "waxed paper" separator, so it leaves a mess to be vacuumed. I followed up vacuuming with a leaf blower.

I made six M6 guide pins to drop the lid in place with alignment, and that worked very well.

IMG_9188.jpg IMG_9187.jpg

The slot is to ease removal of the guide pins after the lid is on. Pliers work, but the slot makes is much easier to remove them. There's an issue with the butyl tape wanting to stick to the guide pins and wind around them as they're inserted. A dab of oil on the pin reduced that tendency.
 
Last edited:
I bought via eBay, it's possible they are counterfeit, but I searched for "fake GV 200", and got zero hits, and the Seller has been selling since 2003.

https://www.ebay.com/itm/155808990751
Judging by this price list*, the original can't cost less than $100.00US.
In Ukraine, Chinese fakes cost no more than 50...

The quality of the resale item does not depend on the experience of the Internet reseller. And who will complain if the contactor breaks after ten of k miles
*https://www.te.com/en/product-2098372-1.html
 
Well, I'm definitely not installing another TE contactor -- that's how we got into this mess -- so comparing TE prices to Gigavac prices is pointless.

Surplus liquidation companies do sometimes sell genuine product at below wholesale.
 
Hello Bishkek!
Take a look
Hello Vladimir Petrovich! Thanks for the links, Europe is rich and far away, we are poor and China is nearby :) in general, there are only two variations - buy on ebay for $ 50, or buy for $ 130 in Europe, but these are not bearings, it's easier with bearings, there is more choice :) . You shouldn't bother your sister about such trifles :) . Chinese sellers on ebay who says what, one says that it is exactly the original made in China, another says that it is a duplicate, the third that it is made in Korea (Made in Kor) but it is sold in China, another says it is made in Mexico (Made in Mex) but for some reason it is also sold in China, everything is very suspicious :) , despite the fact that the price in Europe from distributors is from 120 to 250 $ two types I watched the EVC500 for 126 $ and EV200AAANA for 245$ , EV200AAANA Chinese sell on ebay for 45$ , in Europe prices are always much higher than in China , but after all, these are also original products only made at the TE factory in China, therefore they are much cheaper, I am sure that this is so and they are also of good quality, the Chinese today make very good and high-quality things, especially since there is definitely a TE factory in China and they produce products of this company. You say that they are actively used in Ukraine, these Chinese ones, do you have any operational experience? or maybe someone 's application experience? if they were of poor quality , they would be changed by the thousands every six months or more often , but if you don't hear such horror , then they work fine , I think so . This is the seller https://www.ebay.com/itm/166873500525 he said that what he sells is made at the TE factory in China and the products meet all the characteristics, I want to check it in practice, it is not difficult to replace contactors with rav, and it will be a good personal experience.
 
Hello Vladimir Petrovich! Thanks for the links, Europe is rich and far away, we are poor and China is nearby :) in general, there are only two variations - buy on ebay for $ 50, or buy for $ 130 in Europe, but these are not bearings, it's easier with bearings, there is more choice :) . You shouldn't bother your sister about such trifles :) . Chinese sellers on ebay who says what, one says that it is exactly the original made in China, another says that it is a duplicate, the third that it is made in Korea (Made in Kor) but it is sold in China, another says it is made in Mexico (Made in Mex) but for some reason it is also sold in China, everything is very suspicious :) , despite the fact that the price in Europe from distributors is from 120 to 250 $ two types I watched the EVC500 for 126 $ and EV200AAANA for 245$ , EV200AAANA Chinese sell on ebay for 45$ , in Europe prices are always much higher than in China , but after all, these are also original products only made at the TE factory in China, therefore they are much cheaper, I am sure that this is so and they are also of good quality, the Chinese today make very good and high-quality things, especially since there is definitely a TE factory in China and they produce products of this company. You say that they are actively used in Ukraine, these Chinese ones, do you have any operational experience? or maybe someone 's application experience? if they were of poor quality , they would be changed by the thousands every six months or more often , but if you don't hear such horror , then they work fine , I think so . This is the seller https://www.ebay.com/itm/166873500525 he said that what he sells is made at the TE factory in China and the products meet all the characteristics, I want to check it in practice, it is not difficult to replace contactors with rav, and it will be a good personal experience.
1. Please show a link that confirms the existence of TE plant of TE contactors in China.
2. If, according to you, Chinese contactors are of high quality, although cheap, then why your question? Buy Chinese ones and let your customers be happy!
3. It seems that you do not understand the essence/content of a fake.
AFAIK. Chinese fake contactors save on the material of the contacts themselves and do not use expensive alloys*.
Therefore, their "quality" of contactors can only affect in the relatively long term and after a run of more than one or two tens of thousands of kilometers.
4.
A) Only 269 RAV4EVs are registered in Ukraine, which are repaired in dozens of vehicles repair shops.​
B) Chinese fakes can be distinguished only by indirect signs.​
C) No one keeps records, much less long-term ones (I know of only one exception**).​
Therefore, it is absolutely impossible to collect reliable statistics.

Yes, replacing the contactors is relatively easy.
But removing/re-installing the HV battery is a difficult, labor-intensive and expensive job
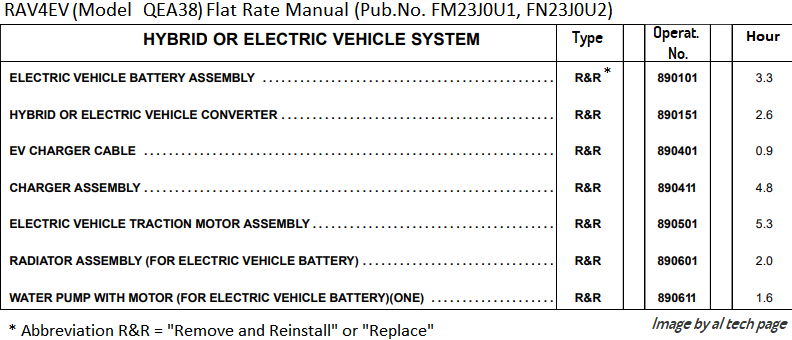
https://alflash.com.ua/2019/to_rav4ev/hybr_flat_rate.png
hybr_flat_rate.png

I don't know, for example, the price of this work in Iraq, but in Ukraine up to $600.00US

*Depending on the purpose, alloys of the following metals are used: silver and sometimes platinum, gold, rhodium, and from base metals - tungsten, copper and rarely molybdenum, nickel.

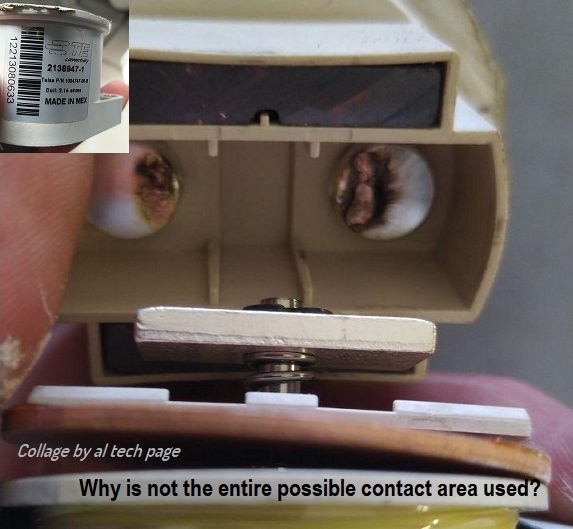
For reference. The appearance of the contacts of a worn-out RAV4EV contactor very little worn contactor.
https://alflash.com.ua/2019/to_rav4ev/contactor_good_.jpg
contactor_good_.jpg


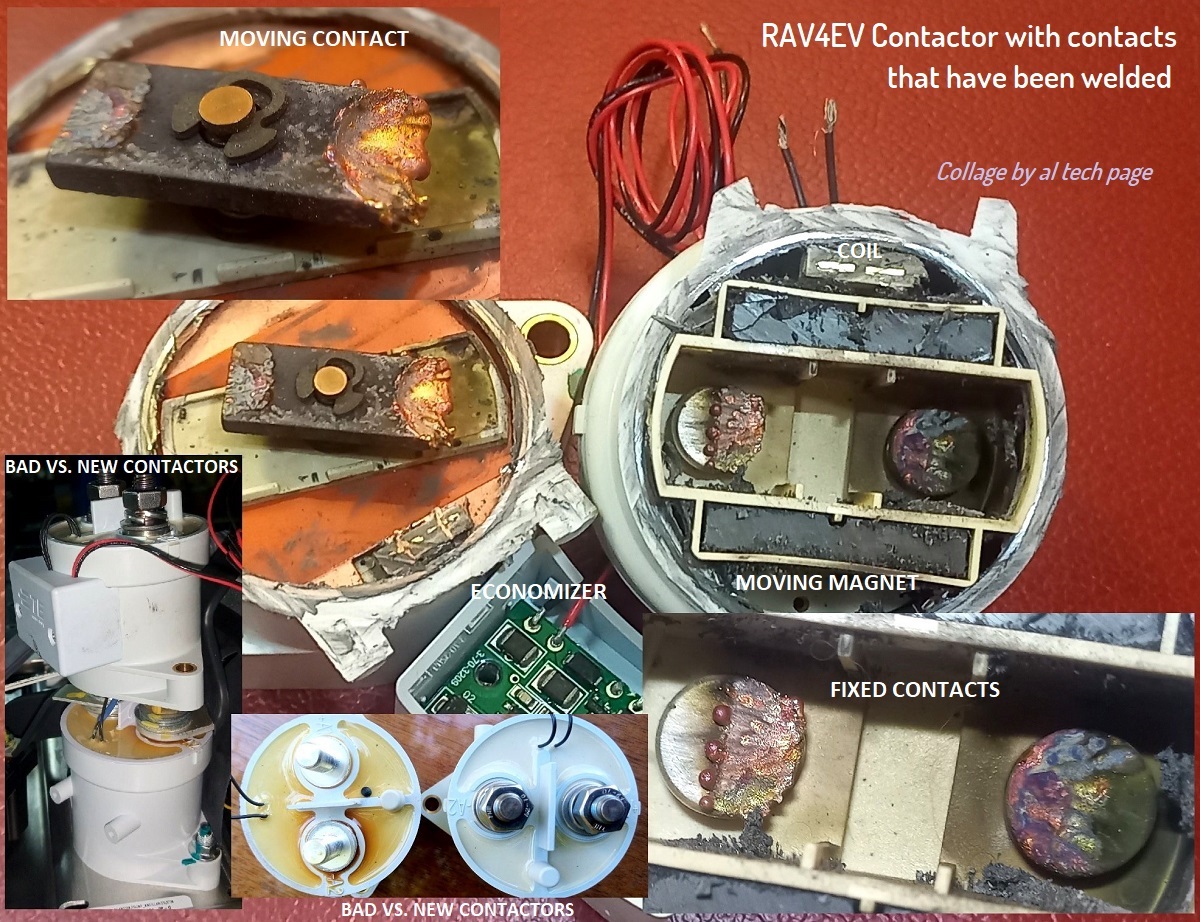
And this is an example of a severe/harsh contactor malfunction
https://alflash.com.ua/2019/to_rav4ev/cont_weld.jpg
cont_weld.jpg


** Off-topic. E.g. History of eight (!) attempts to repair RAV4EVs in three service shops with such a malfunction* and with the code BMS_f107 and others
* https://forum.alflash.com.ua/download/file.php?id=3821
 
Last edited:
Do we have any evidence/reports of contactors being replaced more than once?
In Ukraine, almost no one knows about previous repairs.
In addition, owners often report on this forum that the battery was replaced earlier. But of course, they do not know the cause of the malfunction.
For obvious reasons, in my country you really have to repair a faulty assembly, replacing the faulty part, and not everything together. But there is no record of the repairs performed.
In Ukraine, they have not had time to "switch" to Chinese fakes and there is still hope for a long-term result. Although speculators and dodgers have already begun to "shove" products of "Chinese friends" on buyers for "petty" money.
In my practice, there was one case of early re-replacement, after an unsuccessful attempt to use used contactors from Leaf.
 
Last edited:
1. Please show a link that confirms the existence of TE plant of TE contactors in China.
https://www.te.com/en/industries/me...ring-facilities/manufacturing-site-china.html

AFAIK. Chinese fake contactors save on the material of the contacts themselves and do not use expensive alloys*.Therefore, their "quality" of contactors can only affect in the relatively long term and after a run of more than one or two tens of thousands of kilometers.

May I know from what sources you got this information? is this your personal experience? Have you opened various Chinese contactors that failed prematurely due to their poor quality? What do you think is the point of TE company building its plant in China in order to produce low-quality products? If the TE company has built its plant in China, then products must be produced there that meet their requirements, otherwise there is no point in building this plant.
The same applies to the factory in Mexico, it is there too and high-quality products should also be produced there, or do you think high-quality products are only in Europe and are expensive? but then why build them all over the world? By the way, Teslas made at a gigafactory in China are better in build quality than those assembled from the USA, if you didn’t know that :)
I don't know, for example, the price of this work in Iraq, but in Ukraine up to $600.00US
I don’t know how much it costs in Iraq either, it doesn’t cost me anything :), I can do this work for myself as many times as I want and it will always be free :)
For reference. The appearance of the contacts of a worn-out RAV4EV contactor very little worn contactor.
in this photo I see a contactor made in Mexico, which is sold on ebay for $50, it has good looking contacts, why was it disassembled? he looks like a worker
In Ukraine, they have not had time to "switch" to Chinese fakes and there is still hope for a long-term result.

Have you known these guys for a long time? Do you think this is a quality product they sell?
https://master.shop/ru/570264
 
1.My question was about the production of TE contactors in China. But they are not even mentioned among the products of this enterprise Screendhots in attach.).

2.There is no production of TE contactors in China (see point 1). But common sense allows me, as AFAIK, to ask why (s kakoro bodyna - an untranslatable idiomatic expression) the wholesale price of an alleged TE contactor would be twice (or more) lower than one made, for example, in Mexico or Korea? Unless they save on not using expensive metals.
p.s.​
I wonder why contactors are manufactured in China if they are made very close by - in the Republic of Korea?
https://alflash.com.ua/2019/to_rav4ev/connt_kor.jpg
connt_kor.jpg


3. I did NOT evaluate the quality of the Mexican contactors that were used in the 2012-2014 RAV4EV, but I think it is good. Although I assume that Tesla miscalculated/made a mistake and it was necessary to use more powerful contactors.
https://alflash.com.ua/2019/to_rav4ev/contactor_.jpg
contactor_.jpg


4. Rumors that the quality of Tesla cars from China is higher than those made in America are manipulation spread by scammers-resellers.

5. They stuck this sticker on Chinese fakes even 5 years after TE stopped producing this type of contactors - "Na zabore napisano xy#, a tam drova!" (excuse me, again an untranslatable idiomatic expression).

6. The fact that you DO NOT VALUE your own time and your work is your personal attitude to yourself and it is without comment.

And the main result of this useless discussion. First you state that it is impossible to buy original high-quality contactors due to the abundance of Chinese fakes. And then you contradict yourself, stating the production of cheap, supposedly original Chinese devices. Where is the logic? Where is the common sense? Or was it trolling?
So look among https://www.te.com/en/customer-support/authorized-distributors.html?f1=116

I apologize to other readers for this long and useless flame

https://www.te.com/content/dam/te-c...400.jpg/jcr:content/renditions/hero-story.jpg

Component Capabilities​

Manufacturing Process Capabilities​

Services​

  • Connector and cable development and manufacturing
  • Devices product development and manufacturing
  • NPI prototyping, pilot run, validation and volume production
  • Lab testing, 3D printing, cleanroom assembly, subassembly to finished devices
 

Attachments

  • Screenshot_20241001_204002_Chrome.jpg
    Screenshot_20241001_204002_Chrome.jpg
    329.8 KB
  • Screenshot_20241001_204038_Chrome.jpg
    Screenshot_20241001_204038_Chrome.jpg
    260.9 KB
Last edited:
There is a fair amount of paint bubbling and rust on the lid of this battery pack, the extent of which I did not investigate or appreciate until far into the process. I used some abrasive tools to remove the worst of it, and rattle-can sprayed Rustoleum over the areas (two coats).

IMG_9264.jpg IMG_9263.jpg IMG_9262.jpg IMG_9261.jpg IMG_9284.jpg IMG_9285.jpg IMG_9286.jpg IMG_9282.jpg IMG_9283.jpg

In retrospect, I would do this next time by having the lid bead blasted, then respray the whole thing, as the factory paint is not adhering well to the base metal, and there's more coming up than I realized.
 
The 1/4 round butyl tape seems to work well to have the M6 holes clear of adhesive while installing. This picture shows my second attempt, and I was much more careful to route the tape to miss the nuts, as the butyl likes to adhere to the screws very well and can wad-up the butyl while trying to fasten the lid. This picture shows only the first course; I put down an "inner" and "outer".

IMG_9257.jpg

The first time I set the lid in place, I had neglected to align both of the large o-rings (for the Service Disconnect, and the dehumidifier), so I had to remove the lid -- and all the new butyl tape -- and install it a second time.

Then, I started fastening one side without the long aluminum reinforcing channel in place, and I didn't realize that until I'd run several screws in. Upon removing the screws, three would not come out. I think that I may have bottomed-out the screws in rivnuts, and thereby loosened them, so they're no longer captive. I was eventually able to remove the three screws, but that didn't solve the underlying issue of the nuts' ODs not being fastened in the parent material anymore.

I was not happy with the prospect of removing and resealing the lid a third time, so I elected to use caulking around the seams and screw heads of the affected area, leaving myself a note about what I'd done, in the form of a label, and next time I'm into the pack for something I will see if those rivnuts can be replaced.

IMG_9324.jpg IMG_9347.jpg

When I went to install the (repaired) HV battery dehumidifier, the painter's tape that I'd used to keep debris from the cavity, itself removed yet more lid paint.

IMG_9342.jpg

After dehumidifier installation, the BMS cover was the last item to reinstall. I elected to revert to the 1/8" x 3/4" butyl tape that I'd rejected for the larger lid, because this lid's fasteners are smaller and the metal even lighter gauge, and importantly the smaller fasteners are also much shorter. I wish I had made some guide screws for this, but I made do with markers.

IMG_9341.jpg IMG_9346.jpg IMG_9344.jpg


The HV battery is ready for reinstallation in the vehicle.

IMG_9351.jpg


We learn from out mistakes; I've learned a lot on this repair.
This was accomplished in the borrowed garage and driveway of a very patient friend.

I wish there were enough of these extant to warrant having silicone lid gaskets fabricated. Even 4-piece ones with glued corners would be a huge reduction in effort to R&R the lids.
 
Last edited:
Back
Top