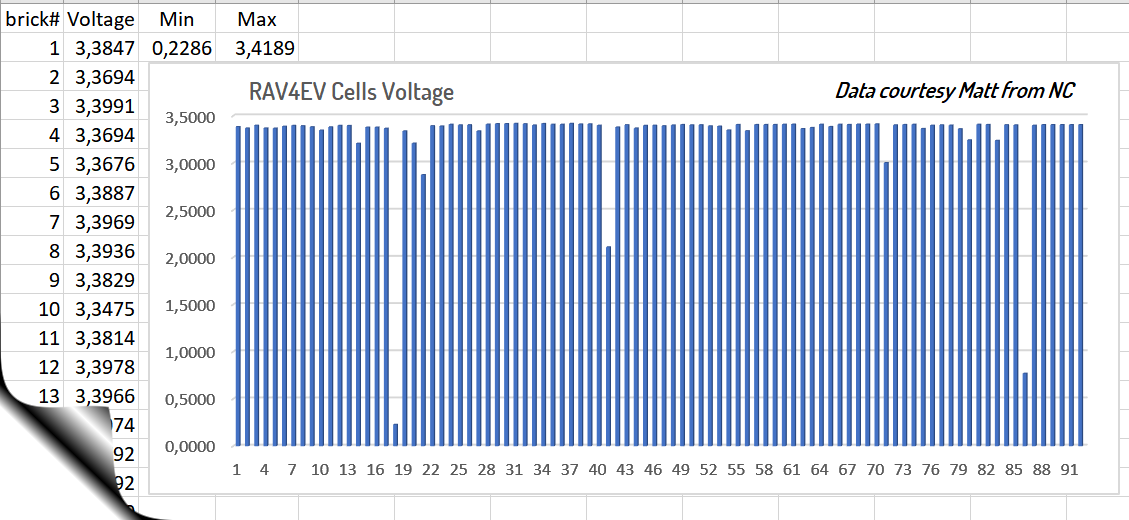
Yes, this data was collected from the blue Tesla diagnostic port. I built a small CAN logger that captures data to an SD card, which I can then import into Excel to decode cell voltages.
You are using an out of date browser. It may not display this or other websites correctly.
You should upgrade or use an alternative browser.
You should upgrade or use an alternative browser.
bad battery repair
- Thread starter patricknicolello095@gmail
- Start date

Help Support Toyota Rav4 EV Forum:
This site may earn a commission from merchant affiliate
links, including eBay, Amazon, and others.
Is this process different than using a CAN dongle, adapted to the CANL/CANH @ DLC3 No. 2, and interpreted by ScanMyTesla? I am under the impression that SMT can do basic CAN logging, but perhaps I misunderstand (I have not purchased the app (USD$10) yet).
Based on Vlad's info here, I've ordered:
CANH = 6 (no change)
CANL = 14 (no change)
* = Signal ground is on #12 on DLC3 No. 2, and #5 on "standard" OBDII, so I'll connect those via crosswiring the extension cable.

Based on Vlad's info here, I've ordered:
- OBDLink MX+ CAN dongle that plugs to an OBDII port. It draws ~68ma. It is based on the STN1110, rather than the widely-cloned-badly ELM327, and filters much faster. Amusingly, the STN1110 is itself obsolete, replaced by the STN2100, but it's still a lot faster at processing CAN data than the elderly ELM327.
- USB 5v -> 12v converter, 1A, to provide 12v to the CAN dongle from one of my USB power banks.
- OBDII extension cable that I can use to inject 12v (because DLC3 No. 2 does not furnish power on #16, which is what most OBDII dongles expect), and correct the shield ground connection (see below*) (later: don't use this cable, it's too difficult to work with. It's one big advantage is that it has a J1962 Type B configuration, meaning it's got the cutout on the center divider for 24v systems, which is the design that Tesla used for the "blue" connector DLC3 No. 2. If you buy a non-Type B OBDII extension cable, you'll have to cut out the plastic key in the center to be able to insert it to the "blue" diagnostic connector.)
CANH = 6 (no change)
CANL = 14 (no change)
* = Signal ground is on #12 on DLC3 No. 2, and #5 on "standard" OBDII, so I'll connect those via crosswiring the extension cable.

Last edited:
I haven't used SMT before. Since I do a lot of Arduino-based tinkering, I simply built a small logger than writes CAN to an SD card as ASCII text, which I can then evaluate in different programs I've written.
How similar is this to your program?I haven't used SMT before. Since I do a lot of Arduino-based tinkering, I simply built a small logger than writes CAN to an SD card as ASCII text, which I can then evaluate in different programs I've written.
https://teslamotorsclub.com/tmc/thr...es-and-temperatures-via-can-on-model-s.60509/
Generally I use LabView programs I've written to analyze/reverse engineer CAN data. SavvyCAN is a good open source program, but I haven't spent enough time to learn how to use it efficiently. For decoding brick voltages, I created code in Excel to convert the 14 bit words into real values, and simply paste in representative CAN data as needed.
I had seen the code (above) from EVTV before, and it certainly could be useful to some people. I usually prefer to collect data first then analyze it after; Jack's code is more suited to real-time monitoring.
I had seen the code (above) from EVTV before, and it certainly could be useful to some people. I usually prefer to collect data first then analyze it after; Jack's code is more suited to real-time monitoring.
Vlad has a nice YT vid showing a CAN->SMT setup and I put together something that's working with SMT. Notably, on my list at post #22 above, I do not recommend that extension cable, as it's not of typical construction and was a PITA to modify.
Scan My T3SLA (home website) (iPad version) (Android version)
Vlad shows a few extra hardware bits in his vid that I'm not using; no breakout boxes, for example:


The guys behind SMT say that an ELM327 will usually work OK, with bandwidth limitations. The recommended OBDLink MX+ is fairly expensive, but it also worked out-of-the-box without any of the common hiccups these things can require. I'm not going to recommend it, but it sure is easy to use AFAICT.
I don't see a way to export data from SMT (yet) but I admit I've only used it for ten minutes. No onboard docs.
This is data from my blue car, whilst charging after a long drive (a three-charge day):


SMT's settings have to be set for older cars (firmware < some date), before these screens populate correctly.
Cable modification
Find a better OBDII extension than the one I used, if you do this yourself.


Scan My T3SLA (home website) (iPad version) (Android version)
Vlad shows a few extra hardware bits in his vid that I'm not using; no breakout boxes, for example:


The guys behind SMT say that an ELM327 will usually work OK, with bandwidth limitations. The recommended OBDLink MX+ is fairly expensive, but it also worked out-of-the-box without any of the common hiccups these things can require. I'm not going to recommend it, but it sure is easy to use AFAICT.
I don't see a way to export data from SMT (yet) but I admit I've only used it for ten minutes. No onboard docs.
This is data from my blue car, whilst charging after a long drive (a three-charge day):


SMT's settings have to be set for older cars (firmware < some date), before these screens populate correctly.
Cable modification
Find a better OBDII extension than the one I used, if you do this yourself.
- Route the DLC3 No. 2 pin #12 to the dongle end's #5.
- Inject 12v + on dongle end #16
- Inject 12v - on dongle end #4


Last edited:

$16.06
$16.91
MICTUNING Upgraded Dual USB Port 6.4A QC3.0 Quick Charger with Blue LED Digital Voltmeter Replacement for Toyota, Compatible with Cellphone iPad PDA Laptop GPS (Surface Size 1.6 x 0.9 inches)
Nado Stuff (Authorized Dealer)

$85.69
Toyota Genuine All-Weather Floor Mats for 2007-2012 Rav4-Set of 4, New, OEM,
Royal South Toyota Parts

$87.78
$99.54
Genuine Toyota 2006-2012 Rav4 Dark Charcoal Carpet Floor Mats Set PT208-42051-11
parts.elmhursttoyota com
I used the device aka Break-Out-Box (No. 1) only for quick connection of 12V to ELM327.Vlad has a nice YT vid showing a CAN->SMT setup and I put together something that's working with SMT. Notably, on my list at post #22 above, I do not recommend that extension cable, as it's not of typical construction and was a PITA to modify.
Scan My T3SLA (home website) (iPad version) (Android version)
Vlad shows a few extra hardware bits in his vid that I'm not using; no breakout boxes, for example:
...
Break-Out-Box No. 2 was used to simultaneously work with two programs (TDS and Scan My Tesla) via DLC3 No. 2.
By the way, the Techstream program was simultaneously connected, naturally via a regular OBD-II connector (DLC3). Which was shown in that video.
It causes a little confusion about the voltage of cells allegedly with numbers from 93 to 96, which are actually not in the RAV4EV HV battery
https://alflash.com.ua/2019/to_rav4ev/bricks_v.png
patricknicolello095@gmail
Member
can i bring my 2014 rav 4 down for repair? Im in williams azWe were talking or someone referred you to me because I've herd about this. I'm in Surprise, and we're the ones who pioneered cell level repairs - before Gruber. We regularly repair MS batteries with good results and can do the RAV4 also. Charger repairs too.
ce2078
www.HybridReVolt.com
I've answered the email you sent. Maybe my reply went to spam?
patricknicolello095@gmail
Member
My phone #is 602 738 0728 . Just call me and let me know when I can bring my RAV 4 ev to your shop in Surprise.I've answered the email you sent. Maybe my reply went to spam?
patricknicolello095@gmail
Member
i did not get your emailI've answered the email you sent. Maybe my reply went to spam?
patricknicolello095@gmail
Member
my bad, it was in the spam. i did get it .Matt Merkle did a tesla scan on it an found out some issues . I tried to includ it im the email i sent youi did not get your email
Can you provide the results of the Tesla system scan, such as fault codes, or is this a commercial top-secret?my bad, it was in the spam. i did get it .Matt Merkle did a tesla scan on it an found out some issues . I tried to includ it im the email i sent you
Last edited:
patricknicolello095@gmail
Member
I'm trying to find it . It seems to have gone away some how ? During my correspondence with Matt Merkle he sent the reading as an attachment. I'll see if Matt still has it .Can you provide the results of the Tesla system scan, such as fault codes, or is this a commercial top-secret?
Thank you for your attention to my request.my bad, it was in the spam. i did get it .Matt Merkle did a tesla scan on it an found out some issues . I tried to includ it im the email i sent you
Perhaps these results of diagnostics can be extracted from the attachment to this letter to ce2068 which is stored in the "sent" folder of your email box.
Patrick's RAV has the following error codes shown in TPD:
BMS_f003 HV battery internal fault
BMS_f097 HV battery cell under voltage condition detected
In addition, there are multiple bits set in the raw CAN data that correspond to Model S error codes:
BMS_w003_HW_Module_Alarm
BMS_w007_SW_Module_Alarm_Broken
BMS_w018_SW_Brick_UV
BMS_w064_SW_SOC_Imbalance
BMS_w097_HW_BMB_Under_Voltage
BMS_w146_SW_Brick_Overdischarged
Thanks for the additions.
Judging by the specified codes, the BMB initiates
Faulty communication line with the BMS (BMS_w003) due to imbalance between bricks voltage (for example, BMS_w064), as well as unacceptably low voltage of the brick(s).
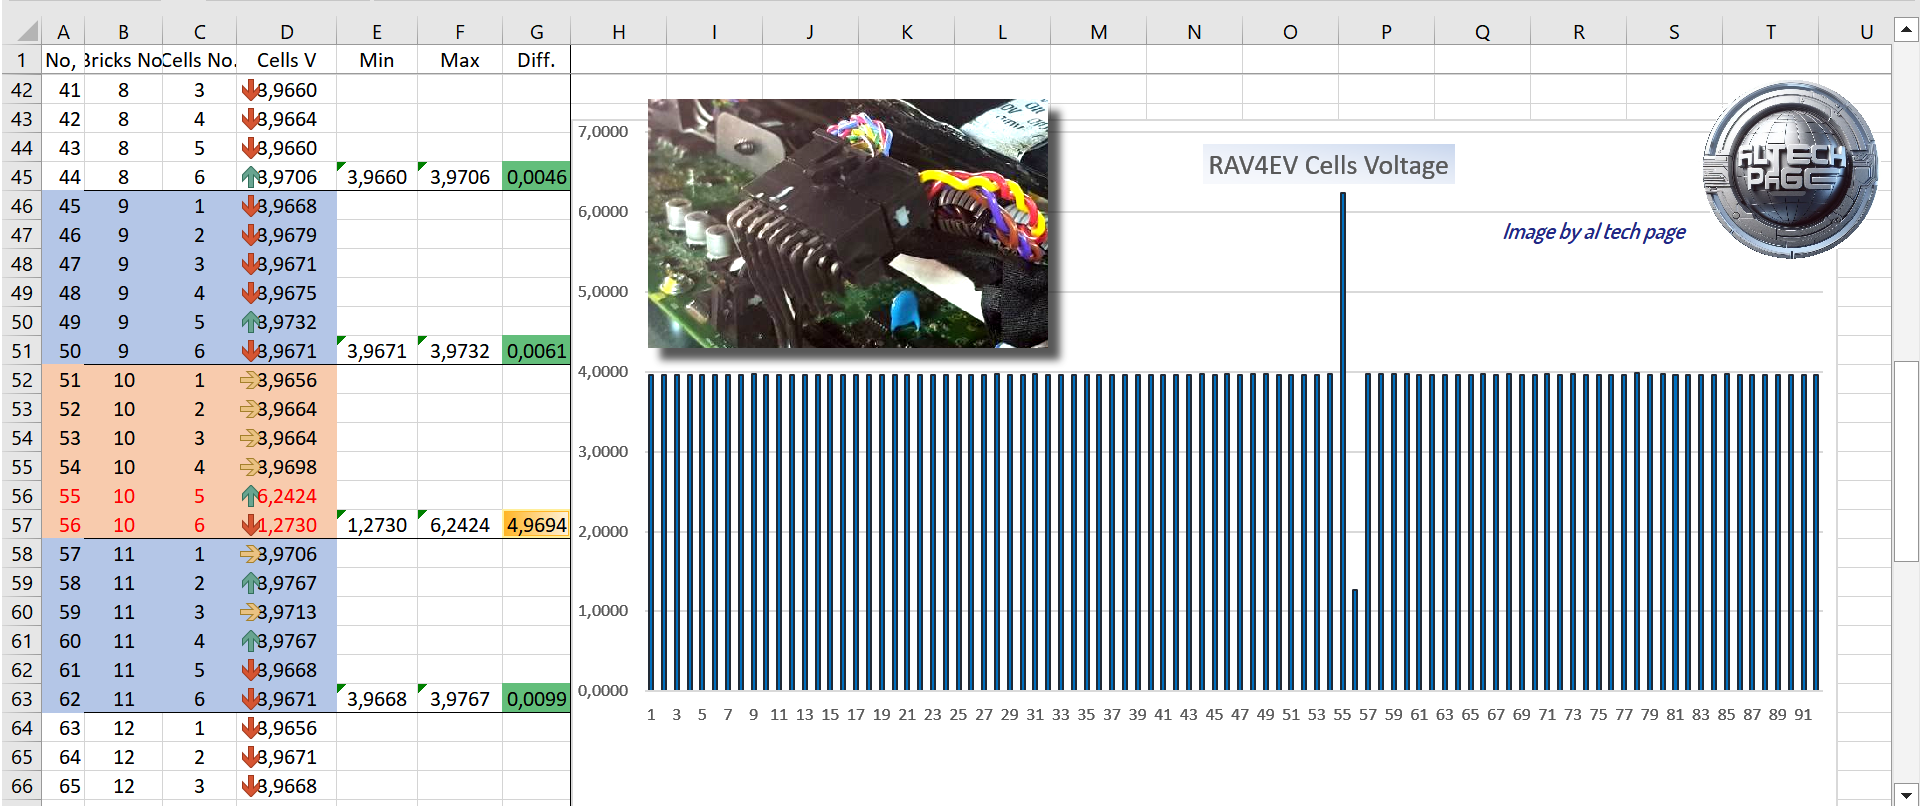
So the question and request. Was the voltage of the cells/bricks checked? If yes, please report the results of such checks.
Examples of unacceptable cell voltage spread
Data from hokiematt https://www.myrav4ev.com/threads/bad-battery-repair.2676/#post-31529
https://alflash.com.ua/2019/to_rav4ev/cells_volt.png

Another RAV4EV
https://alflash.com.ua/2019/to_rav4ev/cells_data.png

https://alflash.com.ua/2019/to_rav4ev/10a.png
Judging by the specified codes, the BMB initiates
Faulty communication line with the BMS (BMS_w003) due to imbalance between bricks voltage (for example, BMS_w064), as well as unacceptably low voltage of the brick(s).
So the question and request. Was the voltage of the cells/bricks checked? If yes, please report the results of such checks.
Examples of unacceptable cell voltage spread
Data from hokiematt https://www.myrav4ev.com/threads/bad-battery-repair.2676/#post-31529
https://alflash.com.ua/2019/to_rav4ev/cells_volt.png

Another RAV4EV
https://alflash.com.ua/2019/to_rav4ev/cells_data.png

https://alflash.com.ua/2019/to_rav4ev/10a.png
patricknicolello095@gmail
Member
I have found a new battery for my 2014 rav 4 ev . I there anyone in Northern Arizona area who might be able to install it .
A new battery? Who sells new batteries for the RAV4 EV? I'm very interested. Even Toyota only sells "remans", and my 2019 reman had the high-failure-rate TE contactors.
miimura
Well-known member
The most likely source of a "new" battery pack is from a car that has other problems like a bad drive unit or collision write off. Of course, by "new" I mean new to him, or a replacement battery for his car.
Similar threads
- Replies
- 11
- Views
- 639
- Replies
- 76
- Views
- 1K
- Replies
- 1
- Views
- 144
- Replies
- 253
- Views
- 12K


