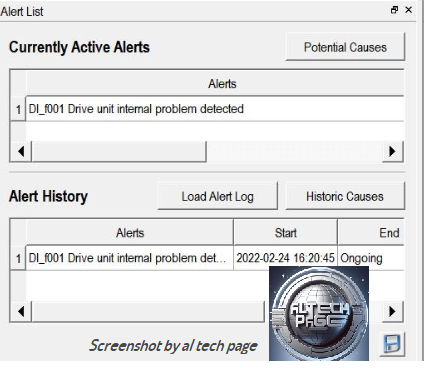
It's not mandatory to replace the rotor bearings -- Johan didn't on his RAV4 EV -- but in my world it's Best Practice. I've got rotor bearings on the way from Acorn in the UK -- supposedly to arrive by tonight, but tracking showing still in Belgium -- best price for
genuine SKF (6007-2RZTN9/HC5C3WT) that I've found at about $252 shipped for (2). I initially had trouble getting past the VATIN field on the Checkout page, but a couple of messages to them via their Contact Us page sorted that out. There are a lot of counterfeit "SKF" ceramic bearings being sold.
The axle seals are always in need of replacement, because they're always leaking
")
Same problem on Model S, too. Tesla doesn't sell parts (a generality), so best I think they're best sourced via Toyota. It's been posted that they're Toyota
17292-0Z010 but I haven't verified that. I do need to get some coming. I'm surprised there isn't a generic seal available.
You're not supposed to re-use the axle nuts, 90080-17238, $20 for two from my local Toyota dealer (where I can be sure they're genuine). I'm picking those up Friday, they're in Will Call.
I'm doing a "coolant delete" manifold modification via a machined 6061 plug "hat", so I'm not buying a rotor seal; I have a sort of prototype seal from Germany, which I paid ~$105 for a few months ago that I'd make you a very good deal on, should you want it, but I have to say that you're going to have a real challenge getting a reliable liquid seal to that rotor, with its wear and damage.
Are you planning to try a Speedi-Sleeve? Or a custom machined spacer (has to very very thin, hard to do)? Or the flame-spray + machining that Howard tried unsuccessfully? Or re-plating + machining? All these options have been tried, and none have proven 100% successful. Since I doubt I'll ever overheat this rotor in RAV4 EV usage -- I just don't drive that hard, or tow heavy loads up mountains -- I'm going with the "don't need liquid cooling" route for mine, via the coolant manifold modification, though it's tempting to just cut off the last inch of the rotor to simplify the lathe work for the manifold plug, down to a simple 3/8" thick circle, ~55.05mm OD.