Taking foot off the break pedal disables the vehicle.

Toyota Rav4 EV Forum

Help Support Toyota Rav4 EV Forum:

This site may earn a commission from merchant affiliate links, including eBay, Amazon, and others.

tjlee

Member
Joined
Mar 10, 2024
Messages
16
Location
Rancho Cucamonga, CA
I'm hoping someone in the Rav4 EV community had similar issue as I have and shed some light. The car starts normal with ready indicator but as soon as I put it in drive or reverse and take my foot off the break pedal the warning light comes on and sets the drive to neutral and "Check Power Steering System" light comes on. If I have it on neutral and take off the break pedal it doesn't do anything. It seems this is happening when motor gets engaged for power. Currently the both batteries are fully charged. I ordered a dongle for the TPD and hopefully in few days I'll have that figured out and provide some insight to TPD. Till then any lead will be appreciated.
 
I'm hoping someone in the Rav4 EV community had similar issue as I have and shed some light. The car starts normal with ready indicator but as soon as I put it in drive or reverse and take my foot off the break pedal the warning light comes on and sets the drive to neutral and "Check Power Steering System" light comes on. If I have it on neutral and take off the break pedal it doesn't do anything. It seems this is happening when motor gets engaged for power. Currently the both batteries are fully charged. I ordered a dongle for the TPD and hopefully in few days I'll have that figured out and provide some insight to TPD. Till then any lead will be appreciated.
I assume that the situation with your car coincides with this one.
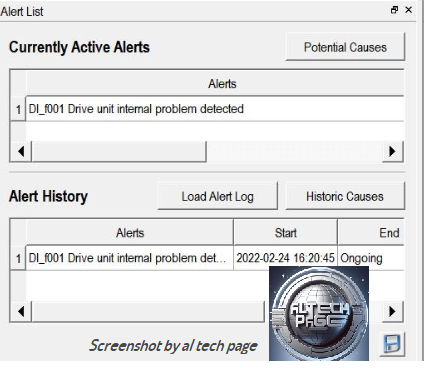
In READY mode, when we try to move the transmission shift lever to D or R, the RAV4EV goes into emergency mode, the lever is thrown into position N with the unpleasant message "Check EV System..." with Tesla trouble code* "Drive unit internal problem detected" and Toyota (indirect) DTC P312F.


*
https://alflash.com.ua/2019/to_rav4ev/di_f001.png
di_f001.png


I'm sure that the seller of the access key will be able to provide full technical support for diagnosing and repairing this malfunction.
 
Last edited:
TPD will provide a better diagnosis than any of us speculating. While waiting for the TPD interface cable to arrive, remove and inspect the motor speed sensor at the end of the motor on the passenger side: a damp sensor is indicative of a leaking rotor seal, which may mean damaged inverter electronics (which could explain your symptoms).
 
An example of the consequences of a coolant leak into the motor of a vehicle that had the same symptoms as those described by the author of this topic.

 
TPD will provide a better diagnosis than any of us speculating. ...
Debatable. Tesla's system for checking and monitoring the health of its systems and components is so stupid that when the stator windings are shorted to its housing, it reports a code indicating an internal fault in the Drive Unit (screenshot posted earlier). And does not indicate the location of the cause of the malfunction (in the Motor or in the Inverter).
And moreover, the repair manual does not mention this code and does not have a description of checks/actions when it is detected (undocumented code) :(
* https://alflash.com.ua/phpBB2/download/file.php?id=3155
 
Update: speed sensor removed and result. It was wet. Blue coolant was below min level as shown below.
TPD dongle made but waiting for laptop to install TPD and tech stream. Purchased dongle for tech stream as will. Will update more after laptop gets installed with all software and get some results. Thank you.
IMG_9620.jpeg
IMG_9619.jpeg
 
I sympathize. Tough work ahead :(
Now this vehicle least of all needs diagnostics...
It might be worth contacting Tony https://www.facebook.com/groups/718609568173137/user/1555218381 (760-798-0342, M-F, 9-5 Pacific Time
[email protected]).

This video shows the result of motor repair


Since then, this car has driven more than 15 ,000 km without problems in more than two years.

Update. Remote check of this vehicle in motion 2 years and 1 day after repairing the motor and rewinding the stator

 
Last edited:
I have installed TPD and made connection to my Rav4EV and got some diagnostic results. It shows "Faulty Drive Inverter" DI_w008, DI_f008 which both points to Drive inverter. I'm ready to get my hands dirty and take this thing apart but I'm concerned about how much info is out there to help me do this. As far as I know I need to disconnect both batteries, most likely dismount the motor, find repair kits, replace drive inverter, and put everything back once it's done. Any source to getting this repaired would be appreciated. I would like repair it myself but just in case does anyone know how much it cost to get it repaired by the repair shop. I live in southern, CA USA.
 

Attachments

  • alert.jpg
    alert.jpg
    329.6 KB
I have installed TPD and made connection to my Rav4EV and got some diagnostic results. It shows "Faulty Drive Inverter" DI_w008, DI_f008 which both points to Drive inverter. I'm ready to get my hands dirty and take this thing apart but I'm concerned about how much info is out there to help me do this. As far as I know I need to disconnect both batteries, most likely dismount the motor, find repair kits, replace drive inverter, and put everything back once it's done. Any source to getting this repaired would be appreciated. I would like repair it myself but just in case does anyone know how much it cost to get it repaired by the repair shop. I live in southern, CA USA.
Such a Detection Item and such a Potential Cause is another trap from the then illiterate Tesla developers of the self-testing system of sensors and mechanisms of the Tesla system.
In the vast majority of cases when this code (DI_f008 https://alflash.com.ua/2019/to_rav4ev/di_f008.png) was read the supposed malfunction of the rotor rotation speed sensor* was either due to jamming of the rotor or due to a short circuit of the stator winding to the housing.
In other words, the Inverter “sees” the immobility of the rotor, but blames the speed sensor for this.
https://alflash.com.ua/2019/to_rav4ev/motor_ass.png

Of course, when the Motor Assembly is removed, you need to look into the Inverter
https://alflash.com.ua/2019/to_rav4ev/54728528_2300179723635177_2075976862042947584_n.jpg

It’s strange that you didn’t notice the advice to contact the main American RAVEV repair specialist, Tony Williams, who owns a BEV popular repair workshop in CA...

* One of the actual inconveniences is that both codes is NOT MENTIONED in the repair manual (undocumented code), and the TDS program does not indicate a test plan for it :)

p.s.
The most informative and high-quality description of eliminating a coolant leak into the engine is presented in the video of this channel
https://www.youtube.com/@diyEVguy/videos
Take a look
https://www.myrav4ev.com/threads/milling-noise-fix.2332/
https://docs.google.com/document/d/1A6n0bkLowViFNtoD2bjzkL_IHk5RLS-mvYRUpe2qzGA/edit
https://photos.google.com/share/AF1...?key=TGE5dTlidWtyMXJ4TzNHZEZfdGhoWm4xRzFkWmtB
https://sites.google.com/view/teslaldu/home
 
Last edited:
Don't know what your vehicle actually needs, but when I got an informal quote a year ago from QC Charge (Tony's shop) they said that doing the whole job of rebuilding a motor with water on the speed sensor (with pulling and reinstalling the motor) was about $5000. Now that I've seen the vids from @aiflash, I understand why.

I really don't know how one would go about DIYing a job like that. I suppose if one were willing to pull the motor and put it back in, it might save a little money, but I wouldn't think all that much. Especially if you then have to ship the motor any distance at all.
 
Last edited:
i had mine done by QC Charge a few years ago and it was around that price. One issue is that its not obvious how much damage there is until the motor is out and disassembled. (mine ended up needing a replacement part which Tony had in the shop from a different motor that had been removed (there arent new Tesla replacement parts for some of the items). So mine was rebuilt with mostly the original parts plus a new one that was actually a used part from a different motor.
 
Don't know what your vehicle actually needs, but when I got an informal quote a year ago from QC Charge (Tony's shop) they said that doing the whole job of rebuilding a motor with water on the speed sensor (with pulling and reinstalling the motor) was about $5000. Now that I've seen the vids from @aiflash, I understand why.

I really don't know how one would go about DIYing a job like that. I suppose if one were willing to pull the motor and put it back in, it might save a little money, but I wouldn't think all that much. Especially if you then have to ship the motor any distance at all.
Judging by the photo of the speed sensor and DTCs, this vehicle at least needs
a) to replace the Teflon oil seals and the ceramic/hybrid bearings of the motor;
b) to check the insulation resistance** between the stator windings and the stator housing with a megaohmmeter*;
c) Mandatory inspection*/replacement of transmission bearings;
d) Mandatory verification of the presence of coolant in the inverter;
e) Mandatory inspection of the surface* of the rotor shaft at the installation point of teflon seal;
f) It is desirable to check the output transistors of the stator windings*

Notes.
*Shown in the video
**Rewinding the stator is a last resort when it is not possible to use a donor stator, for example, from the b250e
 
Last edited:
To add to the list of helpful videos, Alex @ QC Charge posted a video on removing the LDU from a RAV4 that is pretty comprehensive. I've bookmarked it because I need to pull my LDU out for a coolant leak next month:


IMO, it's much easier to R&R the LDU in the RAV4 EV than a Model S, because the Model S requires dropping the rear subframe first.

Mind, this is only getting the LDU out of the car for shipment. Teardown/inspection/cleaning is quite a bit more work, but it's bench work. The unit is around 300 lbs.; the rotor is ~90 lbs. alone. I worked with one on a 2013 Model S last year, we had a dry stator but wet inverter harness, causing codes.

I will be doing the "coolant delete manifold" DIY modification to eliminate coolant flowing through the rotor. There at least three ways to DIY this mod, plus QC Charge's off-the-shelf $700 bolt-on version. It requires some reading, but a good thread on this begins here:

https://teslamotorsclub.com/tmc/posts/7898613/

After modification, coolant continues to flow through the stator and inverter sections, but not the rotor. No teflon seal is needed, and rotor shaft condition is irrelevant. If you're replacing the seal, the rotor shaft end's condition can be "fine" or "must be machined/sleeved/plated to be serviceable", and that can easily run an additional $50-$600.
 
Thank you all for your replies. I don't think having this vehicle repaired for 5k+- by QC Charge is an option. I love learning new things and I see this as a challenge. I always hope I can find enough information from internet to repair broken things myself. You guys have shared so much information to my post no words can describe my appreciation. Thank you everyone.
 
Hello everyone. Last couple days has been pretty busy. Here is the image of me using harbor freight jack to remove the motor. I welded some metal piece laying around to support bottom of the motor and strap around it to secure the motor. I wondered whether it would hold the weight and balance the motor to remove but by surprise it performed quiet nicely. It even swivels as you can see in the image below. The motor is taken apart already but I will post separate to clear my progress. All the infos you guys have shared helped me tremendously in removing the motor. Thank you

IMG_9632.jpg
IMG_9655.jpgIMG_9656.jpg
 
Here is the pictures of all the motor parts. Haven't removed the seals and bearings yet since I have some questions of what I should do.
Should I replace all the seals if so where can I purchase them? Should I reuse seals which is ok and replace only damage seals? I've read so many posts, some old some new and so many options. Would be nice if there is a post section of what's available and where to purchase them. I've checked the bearing by turning them and they seem ok. Just some discoloration outside of the bearing do to coolant. I will take the cover off and check bearings inside to see if it needs new grease or replacement.

IMG_9634.jpgIMG_9637.jpgIMG_9638.jpgIMG_9642.jpgIMG_9644.jpgIMG_9646.jpgIMG_9647.jpgIMG_9648.jpgIMG_9650.jpgIMG_9652.jpg
 
It's not mandatory to replace the rotor bearings -- Johan didn't on his RAV4 EV -- but in my world it's Best Practice. I've got rotor bearings on the way from Acorn in the UK -- supposedly to arrive by tonight, but tracking showing still in Belgium -- best price for genuine SKF (6007-2RZTN9/HC5C3WT) that I've found at about $252 shipped for (2). I initially had trouble getting past the VATIN field on the Checkout page, but a couple of messages to them via their Contact Us page sorted that out. There are a lot of counterfeit "SKF" ceramic bearings being sold.

The axle seals are always in need of replacement, because they're always leaking ;) Same problem on Model S, too. Tesla doesn't sell parts (a generality), so best I think they're best sourced via Toyota. It's been posted that they're Toyota 17292-0Z010 but I haven't verified that. I do need to get some coming. I'm surprised there isn't a generic seal available.

You're not supposed to re-use the axle nuts, 90080-17238, $20 for two from my local Toyota dealer (where I can be sure they're genuine). I'm picking those up Friday, they're in Will Call.

I'm doing a "coolant delete" manifold modification via a machined 6061 plug "hat", so I'm not buying a rotor seal; I have a sort of prototype seal from Germany, which I paid ~$105 for a few months ago that I'd make you a very good deal on, should you want it, but I have to say that you're going to have a real challenge getting a reliable liquid seal to that rotor, with its wear and damage.

Are you planning to try a Speedi-Sleeve? Or a custom machined spacer (has to very very thin, hard to do)? Or the flame-spray + machining that Howard tried unsuccessfully? Or re-plating + machining? All these options have been tried, and none have proven 100% successful. Since I doubt I'll ever overheat this rotor in RAV4 EV usage -- I just don't drive that hard, or tow heavy loads up mountains -- I'm going with the "don't need liquid cooling" route for mine, via the coolant manifold modification, though it's tempting to just cut off the last inch of the rotor to simplify the lathe work for the manifold plug, down to a simple 3/8" thick circle, ~55.05mm OD.
I've taken out the seal for the rotor cover and put it on the rotor. The seal seem like tripple layer seal and only mid layer has issues. It seems to me that outer layer where the seal seals is in good condition and rotor shaft is also shiny in these locations. Only inner part of the seal seems to have issues. I might also go with coolant delete option. I will also purchase axle nuts and axle seals. Are you planning to replace ring shaft snap as recommended. (Toyota 43425-07020 Ring, Shaft Snap) I'm repacking the bears since after clean it seems to be in good condition. Do you happen to know what kind of grease is used in these bearings? I feel finding right parts and ordering is the most time consuming part of this process. So much posts to read to understand whats what. I wish this forum has updated parts section where members can check out and order parts. That would save a lot of time effort trying to find right parts.IMG_9657.jpgIMG_9658.jpgIMG_9659.jpgIMG_9660.jpg
 
Back
Top