
You are using an out of date browser. It may not display this or other websites correctly.
You should upgrade or use an alternative browser.
You should upgrade or use an alternative browser.
Charging: Stopped by System Malfunction
- Thread starter Improve_RAV4EV
- Start date


Help Support Toyota Rav4 EV Forum:
This site may earn a commission from merchant affiliate
links, including eBay, Amazon, and others.

... 2. Can you formulate in one sentence of no more than 10 words the main purpose of the entire HVIL line fragment that is in the Charger?
Gentlemen,
60.4Ω resistor is soldered betw pins 3 & 9 on X042 (can you tell? It's all black (shrink tubing)).
Time to put OBC and the rest back on car and test it.
I'll be back with the result with the preservation of the functions of the system
There is a beautiful and correct solution \ with the preservation of the functions of the system.
A diagram of a new selfmade HVIL electrical circuit that performs the same function of ensuring electrical safety.
https://alflash.com.ua/2019/to_rav4ev/ch_hvil.jpg
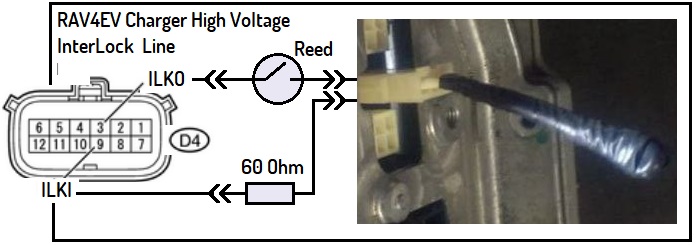
The jumper and reed switch are from the old circuit, and the resistance is 60 Ohm and the wires are different. I assume that this is a simpler repair method than searching for the break or installing another charger.
Last edited:
davewill
Well-known member
To verify that no high voltages are open to touch.Questions for the participants.
1. Can you formulate in one sentence of no more than 10 words the main purpose of the entire HVIL line?
2. Can you formulate in one sentence of no more than 10 words the main purpose of the entire HVIL line fragment that is in the Charger?
Ten by the rule.
Improve_RAV4EV
Well-known member
There is a more beautiful and correct solution
https://alflash.com.ua/2019/to_rav4ev/ch_hvil.jpg
Thanx, but little bit too late. Next time.
Is the Reed Switch actually a diode?
What are the specs of this component, please?
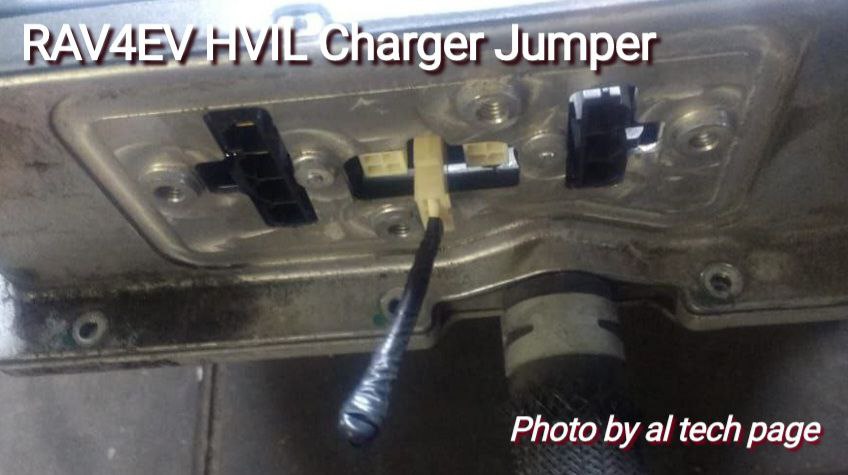
Yes, I agree. And in the charger, this is done by a jumperTo verify that no high voltages are open to touch.
Ten by the rule.
https://alflash.com.ua/2019/to_rav4ev/charger_jumper.jpg
and a reed switch, which perform the function. They and a 60 Ohm resistor must be "in action" to comply with the current mode.
Although, as I understand it, the jumper in the RAV4EV charger is useless.
A reed switch is a sealed contact pair that closes under the influence of a magnetic field. Removing the charger cover removes the magnet and the reed switch opens, and the HVIL circuit is open.Thanx, but little bit too late. Next time.
Is the Reed Switch actually a diode?
What are the specs of this component, please?
With this repair method, this resistor should have been placed on the back of the male D4 connector
Last edited:
p.s. As Tesla teaches, "opening the lid while driving", that is, opening the HVIL line while the car is moving, will not cause the contactors to open.Probably in case somebody opens the OBC lid while driving


Improve_RAV4EV
Well-known member
p.s. As Tesla teaches, "opening the lid while driving", that is, opening the HVIL line while the car is moving, will not cause the contactors to open.
I meant the HV electrocution, if he opens the lid and touches HV.
Without the external jumper J5, you'll never get a reading at X042 (D4) 3 & 9. It's a required loopback to complete the HVIL circuit.However, all the checks are made with lid & side frame off. In other words, J5 was out !
Should I repeat the tests with the frame and J5 inserted?
Matt mentioned this in post #9, "For now you can just do the black low voltage connector on the OBC driver's side, and skip the AC and HV connections until later (but do make sure the white jumper connection at that end of the charger is still installed)."
Matt again in post #69, " . . . there should be a little jumper plugged into the white three pin connector (refer to middle picture of post #43 above). It's pretty easy to knock this jumper out while moving things around."
[A non-sequitur here, but for future readers: the external jumper J5's purpose is to allow interfacing with the Rear HVJB's Lid Switch in a Tesla Model S/X. It's also used when an optional Dual Charger configuration was purchased for those models, as the second OBC doesn't interface with the Rear HVJB. Since there is no Rear HVJB in the RAV4 EV, there's a jumper installed -- always.]
Gentlemen,
60.4Ω resistor is soldered betw pins 3 & 9 on X042 (can you tell? It's all black (shrink tubing)).
Unsubscribed.
Improve_RAV4EV
Well-known member
Without the external jumper J5, you'll never get a reading at X042 (D4) 3 & 9. It's a required loopback to complete the HVIL circuit.
If you remember, before removing the OBC (J5 was in place), I made a little harness and connected it to pins 3 & 9 of X042 to read the Ohms. It showed OL.
Attachments

Improve_RAV4EV
Well-known member
I put the OBC in the car and connected all the cables, including HV & AC.
Connected my little harness to X042 and checked pins 3 & 9. It first jumped around, then showed 67 Ohms.
I did another measurement, this time it stabilized at 72 Ohms.
Connected my little harness to X042 and checked pins 3 & 9. It first jumped around, then showed 67 Ohms.
I did another measurement, this time it stabilized at 72 Ohms.
In other words, the jumper in the RAV4EV charger is an atavism that does not perform the main protection function, but which must be present so that the HVIL line is not broken....
[A non-sequitur here, but for future readers: the external jumper J5's purpose is to allow interfacing with the Rear HVJB's Lid Switch in a Tesla Model S/X. It's also used when an optional Dual Charger configuration was purchased for those models, as the second OBC doesn't interface with the Rear HVJB. Since there is no Rear HVJB in the RAV4 EV, there's a jumper installed -- always.]
Disconnecting the HV wire connection box from the charger will not lead to a break in the HVIL line.
Therefore, the connection with the J5 jumper can be duplicated in another place inside the charger (as shown in #122)?
Last edited:
I put the OBC in the car and connected all the cables, including HV & AC.
Connected my little harness to X042 and checked pins 3 & 9. It first jumped around, then showed 67 Ohms.
I did another measurement, this time it stabilized at 72 Ohms.
As you have now installed a permanent 60 ohm resistor inside the OBC, I would suggest removing the J5 jumper. If the open circuit was caused by a trace lifting off a PCB, it's possibly that this same trace could someday re-establish contact, creating another 60 ohm resistor in parallel. I can't say for sure if the BMS would care about 30 vs 60 ohms, but removing J5 jumper ensures this won't be a possibility.
Hopefully you now have a green light in TPD for the HVIL
")
davewill
Well-known member
If this turns out to be the permanent solution, I'd be concerned about someone in the future reinstalling the jumper thinking it's just missing. I'd either clip one of the wires inside, or put a label on the outside stating it shouldn't be installed.
Improve_RAV4EV
Well-known member
As you have now installed a permanent 60 ohm resistor inside the OBC, I would suggest removing the J5 jumper. If the open circuit was caused by a trace lifting off a PCB, it's possibly that this same trace could someday re-establish contact, creating another 60 ohm resistor in parallel. I can't say for sure if the BMS would care about 30 vs 60 ohms, but removing J5 jumper ensures this won't be a possibility.
Hopefully you now have a green light in TPD for the HVIL
Nothing to worry about, 'cause TPD still gives HVIL error, as I was suspecting.
I wonder if this could be a Firmware problem and updating it to V1.1.103 would remove the f008 code. I'd like to give it a try, but, could I do the update, without clearing the f008 first? Would doing it with f008 create a SW problem this time?
Lastly, would replacing the OBC solve the problem? Should I do a Firmware update, after replacing it?
Where does the update go? Into OBC? BMS? DCDC? Gateway? All of them?? Probably mainly into Gateway computer.
By the way, Tesla could have avoided the "slalom" of the HVIL line wires in the charger, and installed a 60 Ohm resistor in this jumper. As it was done for the Proximity resistor (2.7 kOhm) of the charging port.If this turns out to be the permanent solution, I'd be concerned about someone in the future reinstalling the jumper thinking it's just missing. I'd either clip one of the wires inside, or put a label on the outside stating it shouldn't be installed.
Attachments


Improve_RAV4EV
Well-known member
Unsubscribed.
Please, don't get upset. I wanted to test and prove that the problem is not simply a broken line or something.
By doing this, I wanted to prove that the problem is NOT the HVIL, it is something else in the OBC that triggers an f008 code.
I did this to end our struggle and save time.
Correct me if I am mistaken.
Thank you for your wonderful explanations.
This code, like the vast majority of others, "self-clear/erases" after troubleshooting and restarting.
Forced to repeat what was previously suggested to be checked.
1. Remove the signal connector D9 of the DC-DC Converter wiring and check the resistance of this circuit between pins 5 and 6 (Rall must be 240 Ohm) on its female half.
2. Check the resistance between pins 5 and 6 of the male half of D9. This Rconv must be 0 Ohm.
3. If Rall=0, then it is necessary to check the resistance between the HVIL contacts (ILKI and ILKO) of each of these ECUs*.
Sir, please be kind and report the following results of these measurements:
Rall=?
Rconv=?
Rbat=?
Rinv=?
Rch=?
Notes. All connectors must be connected.
There are two HVIL jumpers in the HV Battery: in the cover that closes its fuse and in the Service plug grip.
If all R, except Rall are OK, then it will be necessary to check the serviceability of the wires that connect the HVIL line between the ECU's.
*Illustration.
https://alflash.com.ua/2019/to_rav4ev/hvil_ch.jpg
Last edited:
Similar threads
- Replies
- 253
- Views
- 12K
- Replies
- 1
- Views
- 152
- Replies
- 0
- Views
- 87